CREAM CHEESE MINTS – Recipe


CREAM CHEESE MINT Ingredients:

= 250g (9 Oz) Cream Cheese, Room Temp
= 57g (1/4 Cup) Unsalted Butter, Room Temp
= 875g-1kg (7-8 Cups) Pure Icing/Confectioners Sugar, Plus Extra
= 1 + 1/2 Teaspoon Mint Extract
= Matcha Powder, 2 Teaspoons or To Taste
= Chocolate Chips, 2 Teaspoons Worth

METHOD:

  1. Over low heat in a saucepan, melt together butter & cream cheese till smooth.
  2. Begin to add sifted icing sugar, you will need a large amount in order to get it to the consistency to be able to handle and shape it.
  3. Once it is firmer bread dough consistency where a large handful holds its shape in your hands it is ready and you can add in flavourings and colors. Make sure to use gel based coloring if you can to not water down the mix.
  4. From here I take the size I want to use to make which was shy of a tennis ball size and rolled it in more icing sugar, kneading between my hands until it was not sticky anymore.
  5. Roll between hands until smooth and round, place on a tray or cutting board and shape neatly as you like. A round, a square, etc whatever you prefer.
  6. You can then take cookie stamps or cutters, press firmly into the mint to emboss it with a pattern. You need to do this soon after rolling or the cookie may begin to crust and set and crack under asserted pressure.
  7. You can flatten out the balls a bit and add chocolate chips, paste fillings of your choice before rolling into a ball and embossing.
  8. For the matcha I simply added 2 teaspoons for each ball and kneaded the powder in by hand to create rustic swirls through it.
  9. You can of course even do very tiny ones with multiple colours by getting the consistency right and fitting it into a piping bag.
  10. Air dry these as is for 2-3 days uncovered. If you are worried about pests, cover it with a cake net so it can still vent out and dry. Once the outside is set relatively firm it is ready.
  11. Store airtight, chilled for longer storage but serve at room temperature or it will be hard.
 

COCONUT FINGER BUNS – Recipe

  • 83ml (1/3 Cup Plus 1 Tablespoon) thickened/heavy or coconut cream
  • 125ml (1/2 Cup Plus 1 Tablespoon) Coconut Milk
  • 1 Large Egg
  • 38g (1/5 Cup) Caster Sugar
  • 250g plain flour
  • 1 + 1/2 Active Dry Yeast
  • 1/2 + 1/4 Teaspoon Salt


METHOD:

  1. Combine all ingredients in the mixer bowl.
  2. Using the dough hook or by hand, knead the dough until it is smooth and elastic.
  3. You should be able to gently and slowly pull a small piece of dough outwards between your finger tips to see an almost transparent ‘window’. This means the gluten has been developed enough.
  4. Tuck the dough downwards to make a smooth ball. Place back into the bowl and cover with cling wrap or clean tea towel. Place in a warm place to prove till doubled in size.
  5. Punch down the dough to let out the air. Divide into portions for buns as big as you want. I went for 6 average-sized finger buns. You can use a scraper or knife dipped in flour to prevent sticking. Roll the dough into a long log and divide it that way.
  6. Take each piece, roll it out into a large rectangle. Roll it up lengthwise into a log, taper the two ends down under. Try to make it even thickness across the log.
  7. Lightly grease the buns and cover with cling wrap. Prove till just a little under doubled in size.
  8. Preheat the oven to 180C (350F), brush the buns with sugar wash and bake for 18-20 minutes till it sounds hollow and is just lightly colored on top.


BROWN SUGAR WASH:

  • 2 Tablespoons Dark Brown Sugar
  • 2 Tablespoons Coconut Milk

METHOD:

  1. Combine the ingredients in a small bowl.
  2. Whisk till combined and smooth.
  3. Cover with cling wrap till needed, pressing it onto the surface to prevent a skin from filming.


COCONUT ICING:

  • 90g (3/4 Cup) Pure Icing/Confectioners Sugar, Sifted
  • Coconut Milk, As Needed
  • Desiccated Coconut, As Needed


METHOD:

  1. Stir coconut milk little by little into the icing sugar until you get a thick icing that is spreadable but over a length of 10-15 seconds will still settle and become smooth.
  2. Before the icing completely sets, but has already settled smooth, sprinkle and cover the iced parts generously with desiccated coconut.

NUTELLA CINNAMON BUNS – Recipe

RICH, COFFEE DOUGH Ingredients:

  • 1 + 1/8 Teaspoon Active Dry Yeast
  • 125ml (1/2 Cup) Milk, Warmed
  • 1 Sachet of Strong Coffee Powder
  • 50g (1/4 Cup) Caster Sugar
  • 38g Unsalted Butter, Room Temperature
  • 1/2 Teaspoon Salt
  • 1 Large Egg
  • Extra Egg For Egg Wash, Beaten
  • 250g (2 Cups) Plain/All-Purpose Flour


METHOD:

  1. Preheat oven to 150C (302F).
  2. Whisk in a sachet of strong coffee powder (use more if you want the flavour even more) into the warm milk.
  3. Make sure the temperature is tepid (feels neither hot or cold but about body temperature – should feel neutral to you) before whisking in the active dry yeast.
  4. Set it aside while you prepare the other ingredients, so that it has time to activate and froth up.
  5. In your mixer bowl, combine butter, sugar, salt & egg.
  6. Begin to mix with dough hook on med-low speed, while you stream in the activated yeast mix.
  7. Now begin to sprinkle in the flour.
  8. Once the flour is completely incorporated, begin to add 2 tablespoons worth flour at a time, mixing it in completely before adding more.
  9. Be careful not to add too much or your dough becomes tough and chewy, rather than soft and fluffy – it also affects the level of proving you can get.
  10. What you are looking for is enough flour to get the majority of the dough to come away from the sides and gather in the hook. BUT, you want a film of dough still clinging on the sides of the bowl.
  11. Check with your hands, scraping off the dough to gather into a bowl. It should feel like it is tacky, but leaves almost no residue or mess on your hands.
  12. Tuck the dough downwards to form a smooth surface of a ball on top.
  13. Place it back into the bowl, cover with a cling wrap or damp kitchen towel.
  14. Switch off the oven and place the bowl inside to prove in the closed oven till it is double in volume.


CINNAMON NUTELLA FILLING Ingredients:

  • 100g (1/2 Cup, Packed) Dark Brown Sugar
  • 25g Ground Cinnamon
  • 40g Unsalted Butter, Room Temperature
  • 375g (1 + 1/4 Cups) Nutella


METHOD:

  1. Stir together the sugar, cinnamon and butter until a smooth paste is formed.
  2. Take the proved dough and press down to deflate the air inside.
  3. Place on a lightly floured surface, form it into a level, long rectangle shape.
  4. Roll it out so it is about 3-4mm thick, shaping it as you go to keep it neat.
  5. I prefer my hands, you can use a spatula to spread the cinnamon paste evenly all over the dough till it is well covered.
  6. Dollop the nutella all over and then gently drag or spread it with a spatula so that the majority of the surface is covered. Then use the tip of the rubber spatula to level it out.
  7. Now rolling the bun from short end gives you many rings and it is great for a jumbo sized bun – which is what I was after. Lengthier side gives more rolls but less rings but are both just equally delicious.
  8. Start by rolling a tiny roll as tightly as possible, then working half a roll at a time begin to roll it up until you have an entire roll.
  9. Use your hands to stretch and smooth the roll so that it is even in thickness.
  10. Use dental floss to loop around the desired thickness of your jumbo buns, and then pull until it cuts through a clean slice.
  11. Gently using both hands hover the bun above the muffin tin or silicon mold (I actually liked the silicon mold results better, they didn’t stick as much so didn’t damage my buns, and also have a slight different texture.) and gently drop it into place. The aim is to keep the nice swirl and shape of the bun 🙂
  12. Use the same method of proving to prove in the off oven until doubled in volume.
  13. Egg wash with beaten egg all over and bake for 20 minutes or so in a preheated oven at 180C (350F) until golden brown. It will be really nice and dark, crispy but fluffy and soft full of gooey goodness inside.
  14. I recommend always heating these up before serving, even just nuking in the microwave 🙂

SALTED CARAMEL & HAZELNUT FILLED SOFT COOKIES – Recipe

SALTED CARAMEL & HAZELNUT FILLING Ingredients:

  • 150g (2/3 Cup) Caster Sugar
  • 50ml (4 Tablespoons) Water
  • 60g (1/4 Cup) Thickened Cream
  • 35g (2 + 1/2 Tablespoons) Unsalted Butter
  • 1/2 + 1/8 Tsp Salt or to taste
  • 180g (1/2 + 2/3 Cups) Hazelnuts, Coarsely Chopped

METHOD:

  1. Preheat oven to 150C (300F), roast the hazelnuts on a pan for 10-15 minutes.
  2. Rub the skins off with a damp tea towel, repeat this process until the hazelnuts are skinned and golden in color.
  3. The tougher to skin ones I find will come right off after you let it cool off, then just rub between your fingers.
  4. Chop them coarsely into sort of 1/4’s irregular pieces. They do not need to be neat, it gives more texture that way but avoid having too many full nuts as it would be hard to fill cookies.
  5. Over medium-high heat, cook the sugar and water in a medium heavy bottomed saucepan without stirring.
  6. Once the sugar dissolves and mixture turns a dark amber color, add the cream. * Be careful as the mixture will bubble and spit a little.
  7. Swirl and stir it until it subsides, about 30 seconds – remove from heat.
  8. Stir in the butter & salt, then the chopped hazelnuts till combined.
  9. Allow to cool completely and check if it is almost firm but barely pliable. This is the correct level of cooking for the caramel.
  10. Spoon mixture whilst lukewarm onto one inner side of cookie, then sandwich another over the top. About the thickness of the cookie or less is good.
  11. The more you add the richer it is and messier it may get – and you want the flavour to be balanced.


SOFT, VANILLA COOKIES Ingredients:

  • 113g (1/2 Cup) Unsalted Butter, Room Temp
  • 100g (1/2 Cup) White/Granulated Sugar
  • 1 Large Egg, Room Temp
  • 1 + 1/4 Teaspoon Vanilla Extract
  • 156g (1 + 1/4 Cups) Plain/All-Purpose Flour
  • 1/4 Teaspoon Baking Soda
  • 1/4 Teaspoon Baking Powder
  • 1/8 Teaspoon Salt

METHOD:

  1. Preheat oven to 180C (350F).
  2. Grease & line 2 large baking trays with baking paper.
  3. Whisk together the dry ingredients until combined.
  4. Cream butter and sugar till fluffy and pale.
  5. Beat in the vanilla & egg.
  6. Scrape down base and sides and beat in flour mix just till combined.
  7. Take 1 teaspoon or so of dough and roll into a ball.
  8. Leave 2″ between every cookie and bake for 12 minutes until set and lightly golden around edges. These are very soft, if you prefer a bit more crisp then bake for few more minutes till more colored.
  9. Cool completely before filling with nut-caramel.
  10. To apply filling, simply warm the caramel if it is set just until it is soft and pliable.
  11. Spoon as much as you like and place it onto one side of the cookie, use greased finger to smooth it out till it is just within the edge.
  12. Lightly press the other biscuit of the pair on top. They caramel can ooze a little if it is still too warm so have a bit of room for that.

COCONUT & CRANBERRY MUFFINS – Recipe

COCONUT CRANBERRY MUFFIN Ingredients:

Makes 6 Jumbo Muffins or 12 Regular **

  • 250g 2 Cups Plain/All-Purpose Flour
  • 2 Teaspoons Baking Powder
  • 1/2 Teaspoon Salt
  • 113g 1/2 Cup Butter, Room Temperature
  • 225g 1 Cup Caster Sugar
  • 2 Large Eggs
  • 1 Teaspoon Vanilla Extract
  • 120ml 1/2 Cup Coconut Milk
  • 270g 2 + 1/4 Cups Craisins
  • Small handful of Desiccated Coconut (Optional)

METHOD:

  1. Line jumbo muffin tin of 6 with muffin paper.
  2. In a processor pulse together the dry ingredients except the fruit and sugar.
  3. In a mixer, beat the butter and sugar until it is pale and fluffy, a good 5 minutes or so on medium-high speed.
  4. Transfer into the processor and pulse together with the dry ingredients, stirring the bowl halfway if needed.
  5. Add vanilla extract and one of the eggs, pulse till well combined.
  6. Stir and add the last egg, pulse once more till combined.
  7. Pulse to combine half the milk, then repeat for the remainder, stirring in between if needed.
  8. Stir in the dried cranberries just till mixed in/scattered. Do not mix too much or you develop the gluten.
  9. Scoop and divide evenly among all the muffin cups (an ice cream scoop is great for this). If you have some left over cranberries or you can hold some back, gently scatter some on top.
  10. Freeze for 1 hour or overnight if you are not baking it tonight (I would not recommend more than a night).
  11. Preheat oven to 240C & bake for 10 minutes, then drop the temperature down to 180C for 40-45 minutes till it is lightly golden and feels a light bounce at the center.
  12. I would cover the muffins with a sheet of foil or baking paper about 15 minutes into the second temperature baking. This is to prevent over coloring the coconut and the fruits on top.
  13. Don’t over bake or it will be dry.
  14. NOTE: Freezing is highly recommended as it helps give the muffin more time to rise as the sides set first whilst the center slowly thaws whilst rising. This gives a really lovely dome on top 🙂

MAPLE BLUEBERRY CHEESECAKE COOKIES – Recipe

THUMBPRINT COOKIES Ingredients:

  • 225g (1 Cup) Unsalted Butter, Room Temp
  • 63g (1/2 Cup) Pure Icing/Confectioners Sugar
  • 2 Teaspoons Vanilla Extract
  • Pinch of Salt
  • 250g (2 Cups) Plain/All-Purpose Flour


METHOD:

  1. Beat butter and sugar on high till pale and creamy.
  2. Scrape down the bowl, beat in vanilla and salt.
  3. Mix in flour on medium-low speed just till combined.
  4. Bring dough together into a ball, cover and chill for 30-60 minutes until it is firm.
  5. Roll tablespoons of dough into a ball.
  6. Place on baking paper-lined large baking tray and press down each ball with a your thumb to make an indent at the centre. Use index finger and thumb to start shaping the sides neatly whilst also pressing the indent down to make a neat cookie with an indent about 1cm in height. This should fix any cracks too.
  7. The idea is to make it deep but not too wide.
  8. Fill with cheesecake filling just a little under the brim to leave room for the macerated berries.
  9. Bake for 20 minutes at 160C (325F) or until golden and puffy on middle rack of oven.
  10. Cool for 5 minutes before transferring onto cooling rack.
  11. Cookies can be stored airtight at room temperature for couple of days. Otherwise store in fridge and bring to room temperature before serving.


MACERATED BLUEBERRIES Ingredients:

  • 125g (1 Punnet) Fresh Blueberries
  • 113g (1/2 Cup) Caster Sugar
  • 1 Teaspoon Lemon Zest
  • 1 Tablespoon Lemon Juice
  • 3 Tablespoons Maple Syrup

METHOD:

  1. Combine all ingredients except maple syrup in a bowl or airtight container.
  2. Let stand for 15 minutes before giving it another stir to mix evenly.
  3. The sugar should mostly be dissolved and drawn out the berries liquid after an hour or so.
  4. Stir in the maple syrup.
  5. Macerate for at least a day or overnight. Two days should be fine for a thick-skinned berry like this, but keep an eye on the condition. Do not go for too many days as the berry can also break down too much.
  6. You can store in the fridge after the first day.
  7. Strain out the berries to bake into cheesecake filling or serve on top of baked cookies.
  8. Keep chilled in airtight container until serving. Good at room temperature or cold.


CHEESECAKE FILLING Ingredients

  • 115g (4 Oz) Cream Cheese, Room Temp
  • 84g (Heaped 1/3 Cup) Caster Sugar
  • 1 Large Egg Yolk
  • 1/2 Teaspoon Vanilla Extract
  • Pinch of Salt

METHOD:

  1. Beat cream cheese till smooth and lump free, scraping down base and sides of bowl halfway.
  2. Beat together with rest of the ingredients till smooth & creamy.

IMITATION FOOD SERIES: STUFFED CRUST COOKIE PIZZA – Recipe

RASPBERRY, CHERRY CURD Ingredients:

  • 100g (7/8 Cup Frozen Raspberry
  • 100g (1/2 Cup) Frozen Pitted Cherries
  • 50g (4 Tablespoons) Caster Sugar (depends on how sweet your fruits are)
  • 1 Large Lime Juice
  • 2 Teaspoons Cornstarch
  • Red Food Coloring, Optional


METHOD:

  1. Place ingredients into a medium saucepan. Cook over medium-low heat until the mixture starts to boil.
  2. Puree in a processor.Return to pot over heat. Stir frequently and cook a few more minutes or until it thickens, roughly 5 minutes.
  3. Add food coloring if using and stir until a red ketchup/tomato sauce look is achieved.
  4. Transfer and strain into a heatproof container. Let cool to room temperature then store in the refrigerator with cling wrap pressed directly over the surface of the curd.
  5. If the curd sets too thick or not smooth enough you can add it to a processor and process once more before using. You want some thickness to resemble sauce or relish.


STUFFED-CRUST PIZZA COOKIE Ingredients:

  • 168g (3/4 Cup) Unsalted Butter, Room Temp.
  • 150g (3/4 Cup) Dark Brown Sugar
  • 57g (1/4 Cup) Caster Sugar
  • 1 Large Egg
  • 1 Large Egg Yolk
  • 1 Egg Whites For Glazing
  • 1 + 1/2 Teaspoon Pure Vanilla Extract
  • 280g (2 + 1/4 Cup) Plain/All-Purpose Flour
  • 3/4 Teaspoon Salt
  • Frozen Raspberries, As Needed
  • Handful of Mini Chocolate Chips
  • Chocolate Halva, Handful (Optional)
  • Fresh Mint Leaves, Coarsely Chopped

METHOD:

  1. Preheat oven to 180C (350F), spray a 9″ cake pan or pie dish with non-grease vegetable spray.
  2. Cream together butter and sugars with paddle attachment until smooth and creamy.
  3. Beat in the eggs and vanilla.
  4. In a separate bowl, whisk together the salt and flour before gently beating it into the butter mix.
  5. Do not over mix, beat just until it comes together.
  6. Set aside 1/3 of the cookie dough for the stuffed crust.
  7. Press the remaining dough into the pan until smooth and level.
  8. A few mm in from the edges, put in chocolate chips and frozen raspberries all the way around.
  9. Take a little of the dough at a time, flatten it with finger tips into a long strip and start placing it over the berries and chocolate to cover them.
  10. Neaten it up making sure it looks neat and no parts are too thin that the filling might leak or break through (You can pinch some dough from the base if need to, then smooth it back out).
  11. Bake for 35-40 minutes until cookie is nicely golden brown, shape
  12. return to oven for 10-15 minutes to dry out and cook out base.
  13. Lightly brush non-crust part with egg whites & return to oven just till whites are dried out. This prevents the filling from making cookies too soggy.


COCONUT SAUCE Ingredients:

  • 75g (1/3 Cup) Caster Sugar
  • 2 Large Egg Yolks
  • 270g (1 Can) Coconut cream
  • 2 Tablespoons Coconut milk
  • 1 Tablespoon Corn Flour
  • Pinch of Salt

METHOD:

  1. Whisk egg yolk and sugar in stand mixer till pale and fluffy on medium speed.
  2. Scrape down the bowl half way.
  3. In the meantime, heat coconut cream and milk in saucepan over low heat just until it becomes steamy.
  4. Remove from heat.
  5. Whisk flours into egg mixture till combined, scraping down halfway.
  6. Gradually pour the hot mix into the egg mix whilst whisking on low speed.
  7. Return to the pot and heat on medium low, whisking often until thickened. Takes about 5-10 minutes.
  8. Chill till at least lukewarm before spreading  over the raspberry sauce layer in splotches of varying sizes like cheese.
  9. Torch with blow torch if available.

OXENFREE SANDWICH with CHAI COOKIE DOUGH – Recipe

CHAI COOKIE DOUGH Ingredients:

  • 60g (1/4 Cup) Caster Sugar
  • 40g Loose Leaf Chai
  • 225g (1 Cup) Unsalted Butter, Room Temp
  • 160g (2/3 Cup) Chai Infused Unsalted Butter, Room Temp
  • 65g (5 TBSP) Unsalted Butter, Room Temp
  • 2 + 1/2 Teaspoon Vanilla Extract
  • 1/4 Teaspoon Salt
  • 312g (2 + 1/2 Cups) Cups Plain/All-Purpose or Almond/Hazelnut Meal
  • 2 Tablespoons Milk

METHOD:

  1. For chai infused butter, take the 225g butter, gently melt on low heat in a pot.
  2. Add the loose leaf chai and steep on barely simmering heat for 5 minutes.
  3. Allow to cool for 10 minutes, then immediately strain into a cling wrap lined container or bowl, pressing out as much butter as you can from the leaves.
  4. Leave to chill or set at room temperature.
  5. Once set, weigh the butter and add more butter to have total amount of 225g butter.
  6. Combine butter and sugar in a bowl and beat till very pale and fluffy, creamy and smooth.
  7. Beat in the vanilla, salt, flour or meal, then the milk.
  8. Switch to high speed and beat for about 2 minutes till the mix is fluffy.
  9. Line a 30 x 22cm (11 x 8.5″) tray with baking paper and spread the cookie dough mixture as smoothly and evenly all over the tray.
  10. Freeze or chill the dough until solid before assembling.


MARBLED SUGAR COOKIE Ingredients:

  • 113g (1/2 Cup) Unsalted Butter, Room Temp
  • 113g (1/2 Cup) Caster Sugar
  • 1 Large Egg
  • 1 Teaspoon Vanilla Extract
  • 1/4 Teaspoon Salt
  • 1/2 Teaspoon Baking Powder
  • 250g (2 Cups) Plain/All-Purpose Flour
  • Blue Gel Food Colouring

METHOD:

  • Beat together butter and sugar till pale and fluffy.
  • Beat in egg, vanilla and salt with baking powder just till combined.
  • Scrape down the sides and base.
  • Gradually beat in flour on low speed until a dough is made with no streaks.
  • Set aside 2/3 of the dough, and stir blue colouring into the remaining 1/3 till uniform in colour.
  • Portion and roll into golf ball sized balls, leaving a tennis ball sized portion of the white dough for profile cookies. Lay on working surface lined with cling wrap, alternate colours of regular dough and blue tinted dough forming a rectangle or triangle shape to your like (doesn’t matter much) then knead it lightly to swirl the colour, do not over mix it.
  • Flatten into a disc shape and cling wrap, chill for 30-60 minutes. Do the same with the remaining white dough.
  • Preheat oven to 180C (350F), line a large tray.
  • On a lightly floured surface, place the dough & lightly flour the top.
  •  Roll out dough to 3mm thick or so, turning often to prevent sticking and ensure even rolling.
  • Use a straight edged chopping board or something similar to guide the knife and slice 5cm wide (2″) bars.
  • Cut into irregular triangle time slit shapes, but remember to pair each triangle for the top and bottom of each sandwich cookie. You can use the first one to lay on top and trace over as a guide, or as many varied sizes or shapes as you like with a similar method.
  • Transfer triangles onto a large baking tray lined with baking paper. They don’t need to be too far apart, they do not spread much. Keep chilled till needed.
  • Remove chilled white dough and in the same manner roll out till the same thickness.
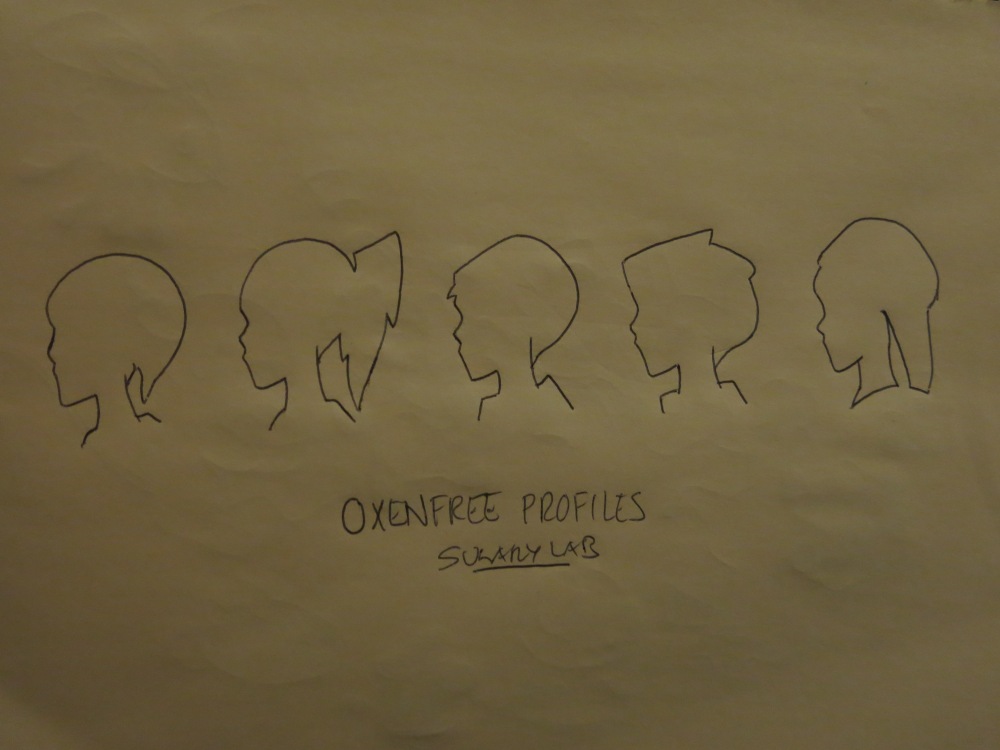
  • Lay character cut-outs over the dough to cut out oxenfree character outlines. Use a sharp knife and trace them out – the colder and firmer your dough the easier this is. Soft dough will tear easily.
  • *** I have included down below my illustrations for you to use for the profile outlines, you can adjust the size and print them out for your own use.
  • Trick is to cut away as many chunks around the character so you can get into the smaller sections. Use the sides of the knife to smooth the side of each profile.
  • Brush triangle with water and lay the character cut-outs on one of each triangle pairing gently.
  • You can make polar bear cookies by keeping them white and use cookie cutter to cut them.
  • Freeze for 20 minutes.
  • Remaining dough can be re-rolled then chilled for more cookie cutting.
  • In a preheated oven at 180C (350F), the mini bear cookies I had took 12-14 minutes, whilst profile cookies take 15-17. Try not to brown them or they’ll lose the aesthetics.
  • Cool completely before assembling.
  • To assemble, take the bottom pair of the cookies and place on top of the chilled cookie dough and simply trace with a sharp knife. Gently ease with knife the dough off the paper and flip it upright. Place the profile cookie on top to match each pair, then let it sit till room temperature so the butter sticks the cookie together.
  • For bears, just use same cookie cutter for filling. If you have a cookie stamp for the bear, it can be used after baking for better definition as this cookie is very soft but doesn’t break so easily.
  • Keep cookies airtight and chilled for storage, serve cold for best texture or cookie dough goes soft very quickly.
  • HAVE FUN! 😀 OLLY OLLY OXENFREE!


IMG_6943.JPG

COFFEE CARAMEL MOUNTAIN COTTON CHEESECAKE – Recipe

FUDGE CAKE BASE

  • 70g (1/3 Cup) Caster Sugar
  • 100g (1/2 Cup) unsalted butter
  • 2 eggs or 1 Large Banana, Mashed
  • 100g (3/4 Cup) Plain Flour
  • 1 Teaspoon Baking Powder
  • 100g (3.9 Ounces) Bittersweet Dark Chocolate, Coarsely Chopped

METHOD:

  1. Preheat oven, grease and line with baking paper, a round pan that is 18cm (7-8″) wide & equally deep. You can also make one with different pans you have in the house if you can’t find any you need. For example in the video I used an adjustable mousse cake making ring mould fitted on a shallow loose bottom cake pan. Well fitted and well lined it worked like a charm.
  2. Wrap two large sheets of foil around the pan and make sure it will be higher than water level in the baking dish or pan you will place the cake pan in. Wrap it well as water may get into your cheesecake batter otherwise.
  3. Melt butter & chocolate in microwave by nuking on 20 second blasts, stirring between each time, until completely smooth.
  4. Stir in the sugar & mashed banana/eggs.
  5. Stir in the flour & baking powder till well combined.
  6. Transfer into the pan and shake to level out.
  7. Wrap & store in fridge till cheesecake mix is made.


CARAMEL SPREAD

  • 150g (2/3 Cup) Caster Sugar
  • 30ml (2 Tablespoons) Water
  • 140ml (1/3 + 1/4 Cup) Thickened/Heavy Cream
  • 15g (1 Tablespoon) Unsalted Butter


METHOD:

  1. The caramel is simple, combine sugar and water in a pot over medium heat.
  2. Watch carefully as it bubbles up. Once it starts to colour in a spot the sugar should all be dissolved, you can swirl the pot to even out the colour.
  3. Continue cooking till the colour is a dark amber (too light it will just taste like sugar), add in the cold cream being careful of the splatter.
  4. Stir until it is smooth over the heat.
  5. Once it is boiling, cook it for 1 minute before removing from heat and stirring in the butter till smooth.
  6. Cool completely in fridge before using.
  7. The consistency should work out perfectly but if yours becomes too thick or runny here’s how to fix it.
  8. Thick: To get it runnier, simply loosen it by warming caramel a little, stir in more cream and adjust consistency from there. Cool to check consistency.
  9. Thin: Return to heat & give it a rapid boil 30 seconds more then cool and check.


CAPPUCCINO COTTON CHEESECAKE Ingredients:

  • 250g 1 (Cup) Cream Cheese, Room Temp.
  • 3 Sachets of Instant Strong Cappuccino Powder
  • 6 Large Eggs, Separated
  • 70g (1/3 Cup) Caster Sugar (Yolks)
  • 60g (1/4 Cup) Unsalted Butter
  • 100ml (1/3 Cup + 1 TBSP) Full Cream Milk
  • 2 Teaspoons Fresh Lemon/Lime Juice
  • 60g (2/3 Cup) Cake Flour / (2/4 Cups) Plain Flour
  • 20g (2 Tablespoons) Corn Starch/Flour
  • 1/4 Teaspoon Salt
  • 2 Teaspoons Pure Vanilla Extract
  • 1/4 Teaspoon Cream of Tartar
  • 70g (1/3 Cup) Caster Sugar (Egg Whites)

METHOD:

  1. Preheat oven to 200C (400F), place rack on lowest level.
  2. Line bottom and grease sides of a 8″ round cake pan.
  3. Over double boiler on simmering water, whisk cream cheese, coffee, butter and sugar slowly until smoothly combined. Whisking time to time, whilst you prepare other ingredients.
  4. Whisk in cold milk to drop the temperature so the yolks don’t scramble.
  5. Whisk in egg yolks one at a time.
  6. Whisk in the vanilla, salt and lemon/lime juice at once.
  7. Sift in the flour then whisk gently till combined.
  8. In a clean, grease-free bowl, whisk egg whites on medium low speed till frothy and you can no longer see the liquid parts.
  9. Add the cream of tartar & continue to whisk on same speed till twice the volume.
  10. Begin to add the sugar gradually in small portions constantly till it reaches about 3/4 up the bowls capacity/height.
  11. It should be soft peaks, easily mounds on itself, still glossy and moves just a little when you tilt the bowl.
  12. Stir in 1/3 of the meringue to lighten the mix.
  13. Fold in another third of the meringue with the whisk gently.
  14. Fold in the last third until almost combined, use spatula to ensure base and sides have no mix that is not combined. Careful not to overmix.
  15. Pour batter into prepared pan over the chilled fudge cake batter. Tap pan gently on counter to release air bubbles.
  16. Bake in waterbath 20 minutes, then reduce to 135C (280F) for 150 minutes. Switch off oven & allow to cool completely. The water should be boiling and fill up to 5cm (2 inches) high at least.
  17. Remove from oven, ensure cake is cool before wrapping and chilling for couple hours or overnight. The fudge base needs the chilling more than the cheesecake as it is super fudgy but supports the cheesecake weight, so don’t unmold till you’ve chilled it thoroughly.
  18. Remove pans, baking paper and set on wire rack with bowl just bit smaller than cheesecake under the cake.
  19. Drizzle with thickened caramel sauce. Make sure each slice will have decent amount of caramel on it as it really makes the flavours work together.
  20. Keep airtight and chilled.

GENMAICHA PUDDING with BUTTERSCOTCH SAUCE – Recipe

GENMAICHA BAKED PUDDING Ingredients (Makes 3 Small Servings)

  • 185ml (3/4 Cup) Thickened/Heavy cream
  • 60ml (1/4 Cup) Whole Milk
  • 60g (1/4 Cup) Dark Brown Sugar
  • 4 Tea bags of Genmaicha
  • 3 Large egg yolks
METHOD:
  1. Heat the oven to 120C (250F).
  2. Add cream, milk, sugar and tea bags to a sauce pan stirring to combine over medium heat.
  3. Bring to a rolling boil for 1 minute.
  4. Turn the heat off, cover and steep for 30 minutes.
  5. Take out the tea bags.
  6. Whisk in egg yolks.
  7. Distribute among ovenproof glasses or ramekins and place in a deep dish or baking tray.
  8. Place into oven, with rack slightly pulled out fill half way up the ramekins with boiling water.
  9. Bake for 30-40 minutes or until it barely wobbles in the centre.
  10. Remove from water bath and allow to cool. Transfer to fridge to chill till nice and cold.

EASY BUTTERSCOTCH SAUCE Ingredients:

  • 43g (2 Tablespoons) Honey
  • 28g (2 Tablespoons) Unsalted Butter
  • 34g (3 Tablespoons) Dark Brown Sugar
  • 98g (1/4 Cup + 1/2 TBSP) Sweetened Condensed Milk

METHOD:

  1. Add honey, butter and sugar to pot over medium heat.
  2. Bring to a rolling boil and boil for 2 minutes, stirring constantly.
  3. Add condensed milk and mix till well combined.
  4. Remove and cool before pouring over puddings.
  5. Serve it chilled with sauce on top, or nuke the sauce a little and allow guests to help themselves.
  6. Store airtight and chilled.